


 Drainage Projects
Fixing 20 Years of Backyard Flooding on Venice Island, FL
For approximately 20 years, the homeowners at this Venice Island property had dealt with a serious backyard drainage problem.
During significant Florida rainstorms, water would collect in the middle of the backyard and continue rising. At times, it rose high enough to flow into the swimming pool and created concern that water could eventually reach the house.
This wasn’t a new problem for the family. They were the third generation living in the home, and dealing with stormwater had effectively become part of owning the property.
During the last hurricane, the problem became especially serious. At approximately 1:00 in the morning, the homeowners were outside digging temporary trenches by hand, trying to relieve the accumulating water before it rose any farther.
They wanted a permanent solution.

Venice Island Drainage Project at a Glance
The Problem: A Backyard Surrounded by Higher Ground
When we evaluated the property, the standing water made sense once we looked at the surrounding elevations and the different sources feeding water into the backyard.
The central portion of the backyard contained a low area. Higher areas along the sides of the property helped create a bowl-like condition where stormwater could become trapped.
The property was also receiving water from several sources:
- Direct Florida rainfall
- Runoff from surrounding higher properties
- Roof and downspout runoff
- Pool deck runoff
- Saturated ground during larger rain events
A neighboring property had also recently been rebuilt and its grade raised. That change further increased the drainage pressure on this already-low backyard.
There was some existing drainage on the property, but it was only partial and wasn’t positioned to adequately address the main problem area.
The visible problem was standing water in the backyard. The real problem was that water from multiple sources was reaching a low area without an effective route out.
The Homeowner Called Asking for a French Drain
Like many homeowners with a flooded yard, the customer initially believed the solution was a French drain.
That’s understandable. “French drain” has become a common name homeowners use for almost any underground yard drainage system.
But we don’t want to decide what type of drainage system a property needs based solely on the name of the system requested.
We first wanted to answer three questions:
Our Starting Point
1. Where is the problem water coming from?
2. Where is it collecting?
3. Where can we move it?
On this project, the primary need was not to collect subsurface water through a long gravel-and-perforated-pipe trench.
The more important objective was to capture concentrated water at the backyard low points and give that water an unrestricted route toward a lower discharge point.
We Started by Shooting the Property Elevations
One of the biggest mistakes that can be made on a drainage project is assuming which direction water will flow based only on what the property looks like.
Venice Island is relatively flat, and small elevation differences can determine whether an underground gravity system works correctly.
We used a laser level and receiver rod to measure the elevations along the proposed drainage route.
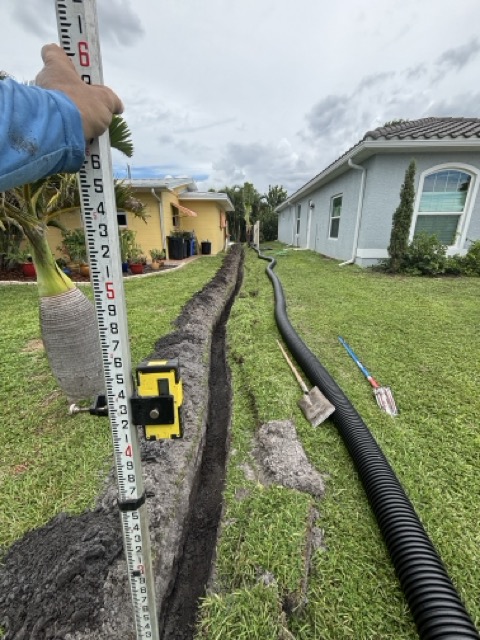
The elevation measurements gave us the critical information we needed: there was an opportunity to move the backyard water toward an existing lower drainage inlet at the front of the property.
That meant we could design the system around gravity drainage rather than installing a pump.
Drainage shouldn’t be installed by guessing at the grade. We want to know where Point A is, where Point B is and whether the elevations between them allow us to create positive flow.
Why We Didn’t Install the French Drain They Originally Requested
Once we understood the elevations and how the water was reaching the backyard, a traditional French drain wasn’t the approach we wanted for this property.
A true French drain generally uses a gravel-filled trench, filter fabric and perforated pipe to collect water moving through saturated soil.
Here, the bigger issue was concentrated stormwater accumulating at known low points.
The available elevations also made efficient use of trench depth important. In some portions of the approximately 130-foot route, excavation approached 16 inches in order to establish the drainage path.
Rather than using that available depth for a gravel-and-perforated-pipe collection trench, we used it to establish a direct route for transporting collected water toward the front drainage inlet.
Once the water entered the system, we wanted to move it.
The Solution: 130 Feet of 6-Inch Gravity Drainage
We designed a relatively simple system around the way water was actually moving across the property.
The installation included:
- 3 surface collection points using 9-inch square catch basins
- Approximately 130 feet of 6-inch solid corrugated drainage pipe
- 2 downspout connections
- Gravity flow from the backyard toward the front of the property
- Discharge into the existing front drainage inlet
- No sump pump required
How the System Works
Two roof downspouts on the east side of the property were also connected into the system so that roof water could enter the underground drainage route rather than being discharged back into the problem area.
Why We Used a 6-Inch Main Drainage Line
This property wasn’t dealing with water from a single source.
During a substantial Florida rain event, the system could be receiving water from the backyard, neighboring properties, roof runoff, connected downspouts and portions of the pool area.
That made drainage capacity an important part of the design.
We selected a 6-inch solid main line to provide a substantial transport route for the collected stormwater.
The pipe was solid because this portion of the system was primarily about transporting water that had already been collected, rather than collecting groundwater continuously along the entire trench.
130 Feet of Trench — Excavated by Hand
Another challenge on this Venice Island project was access.
There wasn’t practical machine access along the drainage route, and this was an older property in an established neighborhood.
With older properties, you also don’t always know exactly what you’re going to encounter underground.
For those reasons, the approximately 130-foot trench was excavated by hand.
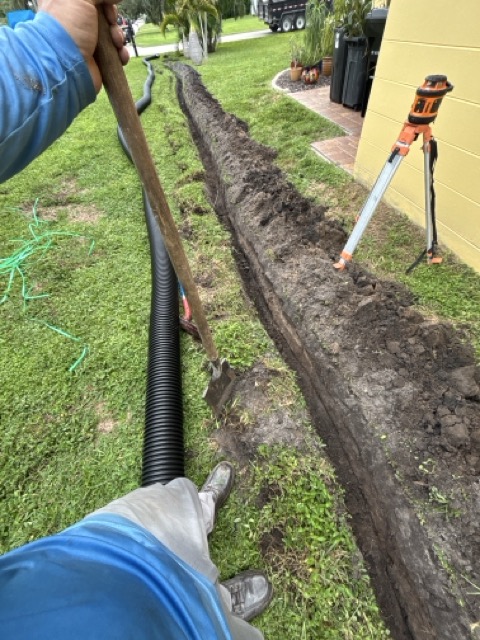
The Installation Process
1. Measure the Property
We shot elevations with a laser and receiver rod to establish the backyard low area, front discharge elevation and required drainage route.
2. Establish the Drainage Path
The route was laid out to create positive flow from the backyard toward the existing front drainage inlet.
3. Preserve the Existing Lawn
Sod was removed as needed along the trench route so it could be replaced after the underground work was completed.
4. Hand-Excavate the Trench
The trench was excavated manually because of limited access and the need for additional caution on an older property.
5. Install the Collection Points & 6-Inch Pipe
Three collection points were positioned to capture surface water and connected to the 6-inch solid underground main line.
6. Connect the Downspouts
Two downspouts were tied into the system using downspout adapters so roof runoff could be directed into the drainage route.
7. Verify Positive Flow
The elevations and system flow were checked throughout installation rather than simply assuming the pipe had adequate fall.
8. Test the System
The drainage system was tested using water, and the property also received rain following installation.
9. Restore the Yard
The preserved sod was placed back over the completed trench. Once restoration was finished, much of the underground route was difficult to distinguish from the surrounding lawn.
The project was completed in approximately two days.
A Drainage System Should Start Working as the Water Arrives
There’s a misconception we sometimes encounter with yard drainage: that the backyard has to fill with water first and then, once enough water has accumulated, the drainage system somehow begins relieving it.
That isn’t the objective of a properly designed gravity system.
The Goal Is Continuous Relief
As stormwater reaches the collection area, it should be able to enter the drainage system and begin moving toward the discharge point.
Instead of allowing the backyard to become the storage basin, we’re trying to provide the incoming water with an available path out.
That’s exactly what this project was designed to accomplish: provide a conduit from the problem area to the exit point so water can begin moving as it arrives.
The Result
The property received rain after installation, and the previous low area remained clear.
The homeowners were extremely happy to finally have a permanent drainage system in place after dealing with the problem for roughly two decades.
For a family that had previously found themselves outside during storms digging temporary relief trenches — including at 1:00 AM during the last hurricane — simply having a designed path for that water represented a major change in how the property could handle rainfall.
We will continue to evaluate system performance as opportunities arise during significant rain events, but the drainage route is now in place to begin moving water away from the backyard as it reaches the collection points.
What This Venice Island Project Teaches About Yard Drainage
The biggest lesson from this project isn’t that every flooded backyard needs 130 feet of 6-inch pipe.
It’s that every property needs to be understood before a drainage system is selected.
Our goal is to determine where the problem areas are, understand how they became problem areas, identify where the water is coming from and determine what we can do with that water.
On this property, the answer was to create an underground conduit that allowed water to move from the backyard low point to an existing lower drainage inlet at the front of the property.
Another property may require a French drain, downspout drainage, channel drain, or landscape sump pump.
The system comes after understanding the water problem.
Venice Island Yard Drainage Project FAQs
Why didn’t you install the French drain the homeowner requested?
The primary problem was concentrated surface water collecting in a defined backyard low area. After measuring the property elevations, we determined that the available grade could instead be used to transport collected water through solid underground pipe toward an existing lower drainage inlet.
Why was solid pipe used instead of perforated pipe?
Once water entered the collection points, the primary job of the main line was transportation. Solid pipe allowed the collected water to be moved through the approximately 130-foot route toward the discharge point rather than intentionally collecting additional water through perforations along the entire run.
Why was a 6-inch drainage pipe used?
The backyard could receive stormwater from multiple sources, including direct rainfall, neighboring properties, roof runoff, downspouts and the pool area. The system was designed with the expected volume and transport requirements of the property in mind.
Did this Venice Island drainage system require a sump pump?
No. Laser elevation measurements showed that an existing drainage inlet at the front of the property provided an opportunity to move water using gravity, so a pump was not required for this design.
Why did you use a laser for the drainage installation?
Small elevation differences matter on relatively flat Florida properties. A laser and receiver rod allowed us to measure the drainage route and establish positive flow instead of relying solely on visual estimates.
How long did the drainage installation take?
The approximately 130-foot gravity drainage installation was completed in about two days, including hand excavation, pipe installation, connections, testing and lawn restoration.
Can Venice Drainage evaluate a yard even if I don’t know what type of drain I need?
Yes. You don’t need to know whether your property needs a French drain, catch basin, gravity system or pump before contacting us. The first step is identifying where the water comes from, where it collects and where it can appropriately be moved.
Dealing With a Flooded Yard in Venice?
If you’re digging temporary trenches during storms, watching water rise toward your pool or house, or repeatedly dealing with the same standing-water problem, it may be time to look at the property as a complete drainage system.
You don’t need to know what type of drainage system you need. We’ll start by evaluating the problem areas, water sources, elevations and potential discharge locations.
